Have you ever found yourself reaching for those expensive bags of jerky at the checkout counter, wondering if you could make something better at home? Making turkey jerky at home was a game-changer for me and my family. What started as a curious weekend experiment has turned into a monthly ritual that saves us money and gives us control over what goes into our snacks.
Turkey jerky offers a leaner alternative to beef jerky while still delivering that satisfying chewy texture and bold flavor we all crave. After years of perfecting my technique, I’m thrilled to share my foolproof turkey jerky recipe that’s packed with flavor but not with preservatives or excess sodium.
Whether you’re meal prepping for busy weekdays, fueling outdoor adventures, or just looking for a protein-rich snack that won’t derail your health goals, homemade turkey jerky checks all the boxes. Let’s dive into this simple yet rewarding process that transforms ordinary turkey into extraordinary jerky!
Table of Contents
Turkey Jerky Ingredients You’ll Need
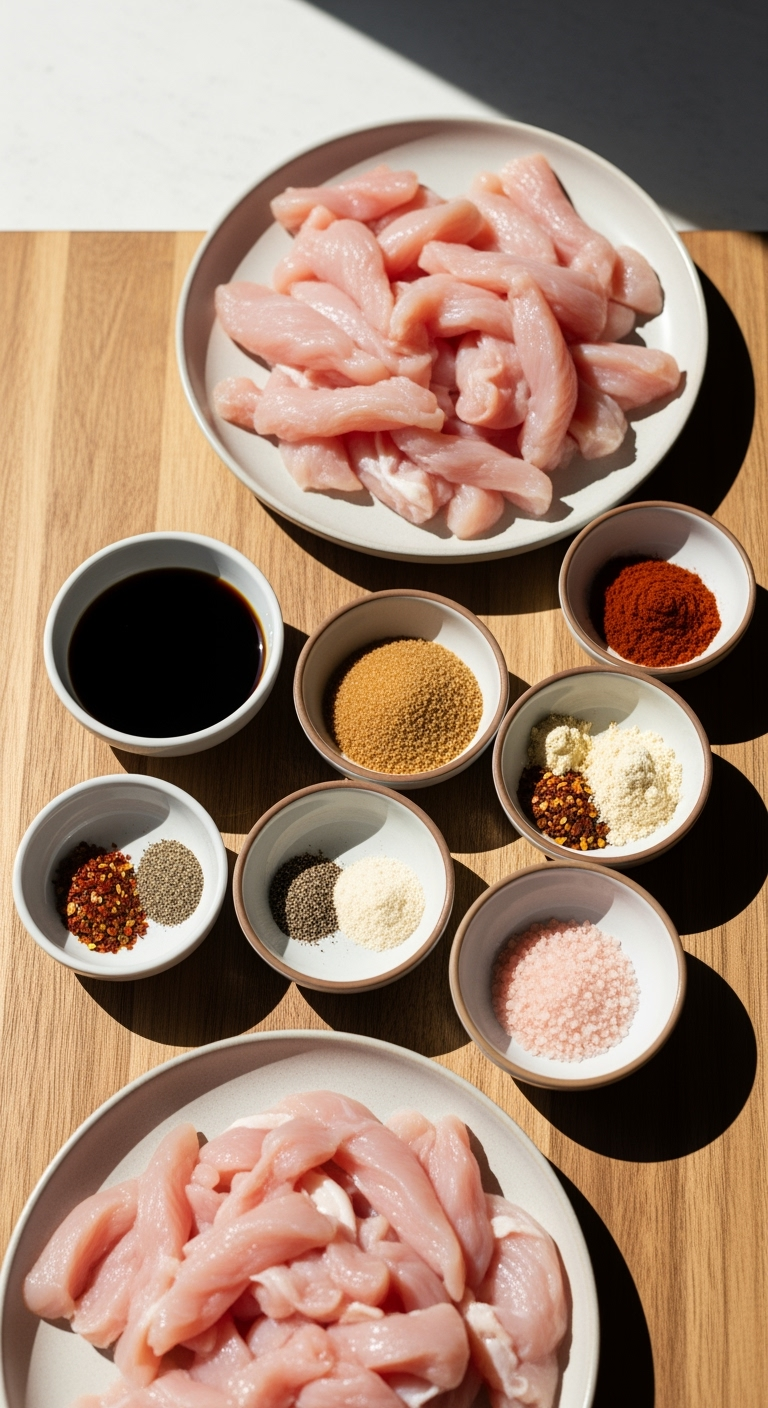
Turkey jerky begins with selecting the right cut of meat and combining it with the perfect blend of seasonings. For the best homemade turkey jerky, you’ll want to start with turkey breast – it’s lean, takes on flavors beautifully, and produces consistent results. Here’s everything you’ll need:

- 2 pounds turkey breast, trimmed of all visible fat
- 1/4 cup low-sodium soy sauce (or coconut aminos for gluten-free option)
- 2 tablespoons Worcestershire sauce
- 2 tablespoons brown sugar (or honey for a natural alternative)
- 1 tablespoon smoked paprika
- 2 teaspoons garlic powder
- 2 teaspoons onion powder
- 1 teaspoon black pepper
- 1 teaspoon red pepper flakes (adjust to taste)
- 1 teaspoon liquid smoke (optional, but adds amazing depth)
- 1/2 teaspoon pink curing salt (optional, helps preserve color and extend shelf life)
Don’t have all these spices? No problem! Many home cooks have found success with pre-made turkey jerky seasoning mixes. However, I find that creating your own marinade gives you complete control over the flavor profile and sodium content.
For those watching their sugar intake, you can substitute the brown sugar with monk fruit sweetener or simply reduce the amount. The sweetness helps balance the saltiness and enhances the meat’s natural flavors.
Timing for Perfect Turkey Jerky
- Prep time: 30 minutes (plus 6-24 hours marinating time)
- Drying time: 4-6 hours (depending on your dehydrator or oven)
- Total time: 5-7 hours (active time approximately 1 hour)
This might seem like a long process, but most of it is hands-off time. The actual active work is minimal, making turkey jerky an ideal weekend project. Your patience will be rewarded with snacks that last for weeks!
Step-by-Step Turkey Jerky Instructions
Making homemade turkey jerky isn’t complicated, but attention to detail makes all the difference. Follow these steps for jerky that’s tender, flavorful, and safely preserved.
1. Prepare the Turkey
- Partially freeze the turkey breast for about 1-2 hours until firm but not solid. This makes slicing much easier and helps you get consistent thickness.
- Using a sharp knife, slice the turkey with the grain for chewier jerky or against the grain for more tender pieces. Aim for slices about 1/8 to 1/4 inch thick.
- Trim away any visible fat – fat can cause your turkey jerky to spoil faster.
2. Mix the Marinade
- In a large bowl, combine all marinade ingredients and whisk until the sugar is dissolved.
- Add the sliced turkey to the marinade, making sure each piece is fully coated.
- Transfer everything to a zip-top bag or covered container and refrigerate for at least 6 hours, preferably overnight. The longer it marinates, the more flavorful your turkey jerky will be!
3. Dry the Turkey Jerky
Using a dehydrator (preferred method):
- Remove turkey slices from the marinade and pat dry with paper towels.
- Arrange slices on dehydrator trays, making sure they don’t overlap.
- Set your dehydrator to 160°F (71°C) and dry for 4-6 hours until the jerky bends without breaking but doesn’t snap.
Using an oven:
- Preheat your oven to its lowest setting (ideally 160-170°F).
- Place a wire rack on a baking sheet and arrange the turkey slices without overlapping.
- Prop the oven door open slightly with a wooden spoon to allow moisture to escape.
- Dry for 4-6 hours, checking occasionally for doneness.
Pro tip: Test a piece by bending it – properly dried turkey jerky should bend without breaking and shouldn’t feel damp. If you see any moisture when you bend it, it needs more drying time.
Nutritional Information for Turkey Jerky
Homemade turkey jerky isn’t just delicious – it’s also a nutritional powerhouse:
- Calories: Approximately 80-100 calories per 1 oz serving
- Protein: 15-18g per serving
- Carbs: 3-5g per serving (varies based on marinade ingredients)
- Fat: 1-2g per serving
- Sodium: 300-400mg per serving (much lower than store-bought varieties)
Turkey jerky makes an excellent high-protein, low-fat snack. It’s particularly rich in B vitamins and minerals like zinc and phosphorus. By making it at home, you control the sodium level and eliminate the preservatives and nitrates found in commercial varieties.
Equipment Needed for Turkey Jerky Success
Creating top-notch turkey jerky doesn’t require fancy equipment, but having the right tools makes the process smoother:
- Food dehydrator – The gold standard for consistent results, but not essential
- Sharp knife – Critical for getting even slices
- Cutting board – Preferably plastic for easy sanitizing
- Large mixing bowl – For preparing the marinade
- Zip-top bags or glass containers – For marinating
- Paper towels – For patting meat dry before dehydrating
- Wire cooling racks and baking sheets – If using the oven method
While a dedicated dehydrator gives the most consistent results, don’t let that stop you from making turkey jerky if you don’t have one! I made my first batches using just my oven and had great success. The key is maintaining a low, consistent temperature and ensuring good air circulation.
Why You’ll Love This Turkey Jerky Recipe
If you’re still on the fence about making turkey jerky at home, here are some compelling reasons to give it a try:
- Budget-friendly: Pound for pound, homemade turkey jerky costs about 60% less than store-bought versions.
- Healthier option: By making turkey jerky yourself, you control the sodium, sugar, and eliminate artificial preservatives.
- Customizable flavors: Once you master the basic recipe, you can experiment with endless flavor combinations from spicy sriracha to sweet teriyaki turkey jerky.
- Portion control: Making your own jerky helps you create perfectly sized snack portions for meal prep.
- Kid-approved: Even picky eaters tend to love the slightly sweet, savory flavor of homemade turkey jerky.
I’ve brought my turkey jerky on countless hiking trips, packed it in lunchboxes, and served it at game nights. It’s always a hit and prompts the inevitable question: “Did you really make this yourself?”
Healthier Alternatives for Turkey Jerky
One of the best aspects of making homemade turkey jerky is the ability to adapt it to various dietary needs:
Lower sodium options:
- Reduce soy sauce by half and replace with pineapple or apple juice
- Use coconut aminos instead of soy sauce (bonus: this makes it gluten-free too)
- Skip the pink curing salt entirely
Sugar-free turkey jerky:
- Substitute monk fruit sweetener, erythritol, or stevia for brown sugar
- Use a small amount of unsweetened applesauce for natural sweetness
Spice variations:
- For AIP-friendly turkey jerky, omit the nightshades (paprika and red pepper)
- For kids, reduce or eliminate the black pepper and red pepper flakes
- For a keto-friendly version, use a sugar-free sweetener and add a tablespoon of olive oil to the marinade
Want to try something completely different? Check out this excellent keto-friendly beef jerky recipe from Harmony Meal that uses similar techniques but with different flavor profiles.
Serving Suggestions for Turkey Jerky
While turkey jerky is perfect on its own as a high-protein snack, there are many creative ways to enjoy it:
- Chop into small pieces and add to trail mix with nuts and dried fruits
- Serve on a charcuterie board alongside cheeses and pickled vegetables
- Crumble into salads as a protein-packed, flavorful topping
- Add to scrambled eggs for a savory breakfast boost
- Pair with apple slices for a balanced sweet-and-savory snack
For a complete meal prep solution, check out Harmony Meal’s guide to healthy snack boxes where you can incorporate your homemade turkey jerky into balanced grab-and-go options.
My family’s favorite way to enjoy turkey jerky is on road trips. We make a big batch before leaving, portion it into small containers, and it keeps everyone happy between stops. Plus, it’s so much better than gas station snacks!
Common Mistakes to Avoid When Making Turkey Jerky
Even experienced cooks can run into trouble when making turkey jerky. Here are the pitfalls to watch for:
Slicing too thick: Turkey slices that are too thick won’t dry properly and could become breeding grounds for bacteria. Aim for 1/8 to 1/4 inch thickness.
Leaving fat on the meat: Unlike beef jerky where some marbling is acceptable, turkey jerky should have all visible fat removed to prevent spoilage.
Drying at too high temperature: If your dehydrator or oven is too hot, you’ll cook the turkey rather than dry it. This creates a different texture and reduces shelf life.
Under-drying: Properly dried turkey jerky shouldn’t feel damp or spongy. Under-dried jerky won’t keep as long and may develop mold.
Skipping the marinade time: Don’t rush this step! A minimum of 6 hours allows the flavors to fully penetrate the meat.
When I first started making turkey jerky, I didn’t pat the meat dry before dehydrating. This added hours to the drying time and resulted in jerky with an inconsistent texture. A few paper towels and an extra minute of prep makes all the difference!
Storing Tips for Turkey Jerky
Proper storage is crucial for maintaining the quality and safety of your homemade turkey jerky:
- Short-term storage: Store in an airtight container at room temperature for up to 1 week
- Extended storage: Refrigerate in an airtight container for 2-3 weeks
- Long-term storage: Vacuum seal and freeze for up to 6 months
For best results, add a food-grade oxygen absorber packet to your storage container. This helps prevent oxidation and extends shelf life.
If you notice any moisture inside the container after storage, your turkey jerky likely wasn’t dried completely. In this case, you can re-dry it in the dehydrator for an hour or two, then cool completely before storing again.
Want to give your turkey jerky as gifts? Package in mason jars with a decorative label, or check out Harmony Meal’s creative food gift ideas for more inspiration.
Wrapping Up: Turkey Jerky Success
Making turkey jerky at home might seem intimidating at first, but it’s truly one of the most rewarding kitchen projects you can undertake. Not only does it save money compared to store-bought versions, but the flavor and quality are incomparable. Plus, there’s something deeply satisfying about creating a shelf-stable protein snack from scratch.
Whether you’re a fitness enthusiast looking for clean protein options, a busy parent seeking healthy snacks for kids, or an outdoor adventurer needing portable nutrition, homemade turkey jerky checks all the boxes. The basic recipe I’ve shared today is just the beginning – once you master the technique, the flavor possibilities are endless.
I’d love to hear how your turkey jerky turns out! Drop a comment below or tag @HarmonyMeal on social media with your jerky creations. And if you’re looking for more protein-packed snack ideas to complement your turkey jerky, be sure to check out Harmony Meal’s complete guide to high-protein snacks.
Frequently Asked Questions About Turkey Jerky
Is turkey jerky healthier than beef jerky?
Turkey jerky is generally lower in fat than beef jerky, making it a good option for those watching their fat intake. It has similar protein content but typically fewer calories per serving. The healthiest option is always the one you make yourself, where you control the ingredients.
Can I make turkey jerky without a dehydrator?
Absolutely! Your regular oven works well for making turkey jerky. Set it to the lowest temperature (ideally 160–170°F), place the marinated turkey slices on a wire rack over a baking sheet, and prop the door open slightly with a wooden spoon to allow moisture to escape.
How do I know when my turkey jerky is done?
Properly finished turkey jerky should be dry to the touch but still pliable. It should bend without breaking and not show any moisture when bent. If it snaps like a cracker, it’s overdried; if it feels spongy or damp, it needs more time.
Can I use ground turkey to make jerky?
Yes, ground turkey can be used to make what’s sometimes called “turkey jerky strips.” You’ll need a jerky gun to extrude the seasoned meat into strips before dehydrating. This method is great for those who prefer a less chewy texture.
How long does homemade turkey jerky last?
Without commercial preservatives, homemade turkey jerky typically stays fresh for 1–2 weeks at room temperature in an airtight container. Refrigerated, it can last 2–3 weeks. For longer storage, vacuum seal and freeze for up to 6 months.
Turkey Jerky Recipes You Need to Try for Delicious Homemade Snacks
Lean, protein-packed, and bursting with bold flavor, this homemade turkey jerky is the perfect healthy snack for road trips, meal prep, or everyday snacking.
- Prep Time: 30 minutes
- Cook Time: 4-6 hours
- Total Time: 5-7 hours (includes marinating)
- Yield: 12–16 servings 1x
- Category: Snacks
- Method: Dehydrating
- Cuisine: American
Ingredients
- 2 pounds turkey breast, trimmed of all visible fat
- 1/4 cup low-sodium soy sauce (or coconut aminos)
- 2 tablespoons Worcestershire sauce
- 2 tablespoons brown sugar (or honey)
- 1 tablespoon smoked paprika
- 2 teaspoons garlic powder
- 2 teaspoons onion powder
- 1 teaspoon black pepper
- 1 teaspoon red pepper flakes (optional)
- 1 teaspoon liquid smoke (optional)
- 1/2 teaspoon pink curing salt (optional)
Instructions
- Partially freeze the turkey breast for 1-2 hours until firm. Slice into 1/8 to 1/4 inch thick strips, either with or against the grain.
- Whisk together all marinade ingredients in a large bowl. Add turkey strips and coat evenly. Marinate in the fridge for 6-24 hours.
- Remove turkey from marinade and pat dry thoroughly with paper towels.
- For dehydrator: Arrange strips on trays, set to 160°F, and dry for 4-6 hours until jerky bends without breaking.
- For oven: Preheat to 160-170°F, place turkey on wire racks over a baking sheet, prop door open, and dry for 4-6 hours.
- Cool completely before storing in airtight containers.
Notes
Remove all visible fat before slicing to improve shelf life. Properly dried jerky should be dry but slightly pliable—not brittle or damp.
Nutrition
- Serving Size: 1 oz
- Calories: 90
- Sugar: 3g
- Sodium: 350mg
- Fat: 1.5g
- Saturated Fat: 0.5g
- Unsaturated Fat: 1g
- Trans Fat: 0g
- Carbohydrates: 4g
- Fiber: 0g
- Protein: 17g
- Cholesterol: 35mg
Follow & Join the Harmony Meal Community
📌 Love indulging in rich and cheesy comfort food?
Get inspired with more crave-worthy breakfasts, comforting dinners, and irresistible desserts.
👉 Follow us on Pinterest for easy-to-save recipes and meal ideas you’ll actually want to make.
📘 Let’s be foodie friends!
Join our community of passionate home cooks and flavor chasers.
👉 Follow Harmony Meal on Facebook to share your own dishes, get exclusive content, and connect with others who love to eat and create.


