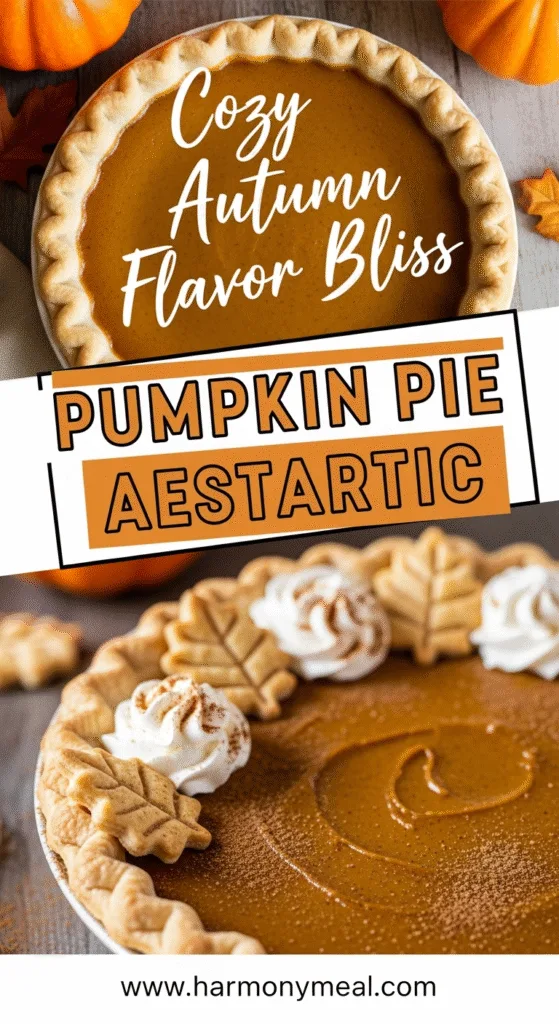
Have you ever noticed how the most memorable desserts are both delicious AND beautiful? When it comes to fall baking, achieving that perfect pumpkin pie aesthetic isn’t just about taste—it’s about creating a visual masterpiece that makes everyone reach for their phones before their forks. I still remember the first time I made a truly Instagram-worthy pumpkin pie. My daughter’s eyes widened as I pulled it from the oven, the surface gleaming with that characteristic burnt-orange sheen, edges perfectly crimped. “Mom, it looks like it belongs in a magazine!” she whispered. That moment reminded me that we truly do eat with our eyes first.
Today, I’m sharing my tried-and-true recipe for creating a pumpkin pie that delivers both on flavor and that coveted pumpkin pie aesthetic that’ll have your guests swooning. Whether you’re baking for Thanksgiving dinner or just craving some fall comfort food, this recipe balances traditional flavors with visual appeal that’s perfect for your holiday table—and your social media feed!
Table of Contents
Ingredients for a Picture-Perfect Pumpkin Pie Aesthetic
The pumpkin pie aesthetic begins with quality ingredients that create both flavor and visual appeal. For this showstopper pie, you’ll need:

For the crust:
- 1¼ cups all-purpose flour
- ¼ teaspoon salt
- 1 tablespoon granulated sugar
- ½ cup cold unsalted butter, cubed
- 3-4 tablespoons ice water
For the filling:
- 15 oz can of pumpkin puree (not pumpkin pie filling)
- ¾ cup granulated sugar
- 2 large eggs
- 1 teaspoon vanilla extract
- 1½ teaspoons pumpkin pie spice
- ½ teaspoon salt
- 1¼ cups evaporated milk
For decoration (creating that perfect pumpkin pie aesthetic):
- ½ cup heavy whipping cream
- 2 tablespoons powdered sugar
- ¼ teaspoon vanilla extract
- Cinnamon for dusting
- Optional: small pastry cutouts from extra dough (leaves, pumpkins, etc.)
You can swap in gluten-free flour for the crust if needed, though it may slightly alter the texture. For a dairy-free version, coconut cream can replace the heavy cream for decoration, and coconut milk can substitute for evaporated milk in the filling.
Timing for Your Pumpkin Pie Aesthetic Creation
- Prep time: 30 minutes
- Crust chilling time: 1 hour
- Bake time: 50-55 minutes
- Cooling time: 2 hours minimum
- Total time: 4 hours 25 minutes (mostly hands-off)
This timing breakdown includes all the steps needed to achieve that gorgeous pumpkin pie aesthetic we’re aiming for. The good news? About 3 hours of this is completely passive time, letting you work on other dishes or decorations while your pie does its thing.
Step-by-Step Instructions for the Ultimate Pumpkin Pie Aesthetic
Creating a pie with the perfect pumpkin pie aesthetic takes attention to detail, but I promise each step is worthwhile!
1. Prepare the Crust
- In a large bowl, whisk together flour, salt, and sugar.
- Add cold, cubed butter and use a pastry cutter or your fingertips to work it in until the mixture resembles coarse crumbs with some pea-sized pieces remaining.
- Drizzle in ice water one tablespoon at a time, gently tossing with a fork until the dough just holds together when squeezed.
- Form the dough into a disk, wrap in plastic, and refrigerate for at least 1 hour.
- Roll the chilled dough on a floured surface into a 12-inch circle.
- Carefully transfer to a 9-inch pie dish, gently pressing into the bottom and sides.
- Trim excess dough, leaving a 1-inch overhang, then fold under and crimp decoratively for that classic pumpkin pie aesthetic.
- Refrigerate the prepared crust for 30 minutes.
Pro tip: Keep everything cold! Cold butter creates those flaky layers we all love, and chilled dough is much easier to crimp beautifully.
2. Create the Filling
- Preheat your oven to 375°F (190°C).
- In a large bowl, whisk together pumpkin puree and sugar until well combined.
- Add eggs one at a time, whisking well after each addition.
- Stir in vanilla extract, pumpkin pie spice, and salt.
- Gradually whisk in evaporated milk until smooth and fully incorporated.
Pro tip: For the silkiest filling texture (key to that perfect pumpkin pie aesthetic), strain the mixture through a fine-mesh sieve before pouring into your crust.
3. Bake to Perfection
- Pour the filling into your chilled pie crust.
- If you’re worried about the crust edges browning too quickly, cover them with foil or a pie shield.
- Bake for 50-55 minutes, until the center is almost set but still slightly wobbly (it will continue to set as it cools).
- The pie is done when a knife inserted 1 inch from the edge comes out clean.
- Cool completely on a wire rack for at least 2 hours before decorating.
Pro tip: To prevent cracks (which can ruin your pumpkin pie aesthetic), avoid overbaking and cooling too quickly. Turn off the oven, crack the door, and let the pie cool gradually for about 30 minutes before removing.
4. Add Decorative Elements
- Whip heavy cream with powdered sugar and vanilla until stiff peaks form.
- Transfer to a piping bag fitted with a star tip.
- Pipe decorative rosettes or dollops around the edge of your cooled pie.
- Lightly dust with cinnamon for a beautiful finishing touch.
- If using pastry cutouts, arrange them creatively on top or around the edges.
Nutritional Information for Your Pumpkin Pie Aesthetic Creation
While we’re focusing on the pumpkin pie aesthetic, it’s good to know what you’re serving:
- Calories per slice (1/8 pie): Approximately 320
- Protein: 5g
- Carbohydrates: 36g
- Fat: 18g
- Fiber: 2g
- Sugar: 22g
- Vitamin A: 120% of daily recommended value
- Calcium: 15% of daily recommended value
Pumpkin is rich in beta-carotene, which supports eye health and immune function—so your beautiful pie offers nutritional benefits alongside its stunning pumpkin pie aesthetic!
Equipment Needed for the Perfect Pumpkin Pie Aesthetic
Creating that magazine-worthy pumpkin pie aesthetic requires a few key tools:
- 9-inch pie dish (preferably glass or ceramic for even baking)
- Rolling pin
- Pastry cutter or food processor
- Fine-mesh sieve
- Mixing bowls
- Measuring cups and spoons
- Whisk
- Rubber spatula
- Piping bag and decorative tips
- Wire cooling rack
- Optional: pastry wheel or small cookie cutters for decorative elements
I’ve found that a glass pie dish showcases the beautiful layers and golden crust that contribute to that perfect pumpkin pie aesthetic we’re aiming for.
Why You’ll Love This Pumpkin Pie Aesthetic Recipe
This isn’t just any pumpkin pie recipe—it’s designed specifically to create that pumpkin pie aesthetic that makes your dessert table shine:
- The crimped crust technique creates a frame-worthy finish that’s actually easier than it looks
- The silky-smooth filling achieves that glossy, crack-free surface that screams “professional baker”
- The decorative elements are completely customizable to your skill level and style preferences
- It’s make-ahead friendly—perfect for busy holiday preparations
- The recipe uses standard ingredients but yields extraordinary results
The best part? Even with its stunning pumpkin pie aesthetic, this pie still delivers that comforting, nostalgic flavor that makes pumpkin pie a beloved tradition.
Healthier Alternatives for the Pumpkin Pie Aesthetic Recipe
You can create a gorgeous pumpkin pie aesthetic while accommodating various dietary needs:
For reduced sugar: Cut sugar to ½ cup and add a tablespoon of maple syrup for depth of flavor without the extra sweetness. The pie will still achieve that glossy pumpkin pie aesthetic.
For gluten-free: Substitute an all-purpose gluten-free flour blend in the crust, or try a crust made from crushed gluten-free gingersnaps mixed with melted butter.
For dairy-free: Replace the evaporated milk with full-fat coconut milk and use coconut oil instead of butter in the crust. The coconut subtly enhances the spices while maintaining that beautiful pumpkin pie aesthetic.
For lower carb: Create a pecan and almond flour crust instead of traditional pastry. The nutty base complements the pumpkin beautifully and still allows for decorative crimping.
Serving Suggestions for Your Pumpkin Pie Aesthetic Creation
To truly showcase your pumpkin pie aesthetic masterpiece:
- Serve slices on white plates to make the colors pop
- Add a small dollop of whipped cream right before serving
- Sprinkle each plate with a light dusting of cinnamon or nutmeg
- Garnish with a small cinnamon stick or star anise for extra visual appeal
- Consider serving alongside warm mulled cider for a complete fall experience
For an elegant dessert table, elevate your pie on a cake stand surrounded by small decorative pumpkins and autumn leaves to enhance the seasonal pumpkin pie aesthetic.
Common Mistakes to Avoid When Creating Your Pumpkin Pie Aesthetic
Even experienced bakers can slip up when trying to achieve that perfect pumpkin pie aesthetic:
Overworking the crust dough: This leads to a tough crust that shrinks during baking. Handle minimally for tender, flaky results.
Skipping the crust pre-chill: Room temperature dough loses its shape and those pretty crimped edges that define the classic pumpkin pie aesthetic.
Overbaking: This causes cracks and a rubbery texture. Remember that the center should still wobble slightly when you remove it from the oven.
Cutting too soon: Patience is key! Cutting into a warm pie ruins both the texture and the clean slices essential to a good pumpkin pie aesthetic.
Under-spicing: Don’t be shy with the spices—they provide both flavor and the warm, amber color that’s characteristic of a beautiful pumpkin pie aesthetic.
Storing Tips for Your Pumpkin Pie Aesthetic Creation
To preserve that beautiful pumpkin pie aesthetic you’ve worked so hard to achieve:
- Cool completely before refrigerating to prevent condensation on the surface
- Wait to add whipped cream decorations until shortly before serving
- Cover loosely with foil rather than plastic wrap, which can stick to the surface and ruin your pumpkin pie aesthetic
- Store in the refrigerator for up to 3 days
- If freezing, do so without decorations and add fresh ones after thawing
For the best taste and pumpkin pie aesthetic, bring refrigerated pie to room temperature about 30 minutes before serving.
Conclusion: Mastering the Pumpkin Pie Aesthetic
Creating the perfect pumpkin pie aesthetic isn’t just about following a recipe—it’s about embracing the art of pie-making. From the perfectly crimped edges to the smooth, glossy filling and creative decorative touches, each element contributes to a dessert that’s as beautiful as it is delicious.
The time you invest in perfecting your pumpkin pie aesthetic pays off in the delighted faces of your family and friends when you present this stunning centerpiece. Remember, a truly beautiful pie needs no filter—just good ingredients, careful technique, and a touch of creativity.
Ready to expand your fall baking repertoire? Check out HarmonyMeal’s collection of fall desserts for more seasonal inspiration, or share your pumpkin pie aesthetic creations with us by tagging @HarmonyMeal on Instagram!
FAQs About Creating the Perfect Pumpkin Pie Aesthetic
Can I use homemade pumpkin puree for a better pumpkin pie aesthetic?
Yes! Homemade puree can create a more vibrant color for your pumpkin pie aesthetic, but be sure to drain it thoroughly to remove excess moisture, which can make your filling runny.
Why did my pumpkin pie crack even though I followed the recipe?
Cracks typically occur from overbaking or cooling too quickly. For a flawless pumpkin pie aesthetic, try baking at a slightly lower temperature or cooling the pie gradually in a turned-off oven with the door cracked.
What’s the secret to getting clean slices that maintain the pumpkin pie aesthetic?
Chill the pie completely, then use a sharp knife dipped in hot water and wiped clean between each cut. This ensures each slice showcases your perfect pumpkin pie aesthetic.
Can I prepare this pie a day ahead without compromising the pumpkin pie aesthetic?
Absolutely! In fact, the flavors meld beautifully overnight. Just hold off on whipped cream decorations until shortly before serving to maintain that picture-perfect pumpkin pie aesthetic.
How can I make my crust edges look professionally crimped for the best pumpkin pie aesthetic?
Use the knuckle-and-finger pinch method: place your thumb on the outer edge and your index finger and knuckle of your other hand on the inside, then pinch at regular intervals for that classic pumpkin pie aesthetic.
Pumpkin Pie Aesthetic Ideas That Will Warm Up Your Fall Vibes

This cozy fall recipe is all about achieving the perfect pumpkin pie aesthetic—crimped edges, silky-smooth filling, and beautiful decorative touches that make it as gorgeous as it is delicious.
- Prep Time: 30 minutes
- Cook Time: 55 minutes
- Total Time: 4 hours 25 minutes
- Yield: 1 9-inch pie (8 slices) 1x
- Category: Dessert
- Method: Baking
- Cuisine: American
Ingredients
- For the crust:
- 1¼ cups all-purpose flour
- ¼ teaspoon salt
- 1 tablespoon granulated sugar
- ½ cup cold unsalted butter, cubed
- 3–4 tablespoons ice water
- For the filling:
- 15 oz can of pumpkin puree (not pumpkin pie filling)
- ¾ cup granulated sugar
- 2 large eggs
- 1 teaspoon vanilla extract
- 1½ teaspoons pumpkin pie spice
- ½ teaspoon salt
- 1¼ cups evaporated milk
- For decoration:
- ½ cup heavy whipping cream
- 2 tablespoons powdered sugar
- ¼ teaspoon vanilla extract
- Cinnamon for dusting
- Optional: small pastry cutouts from extra dough
Instructions
- Prepare the crust: Whisk together flour, salt, and sugar. Cut in cold butter until mixture resembles coarse crumbs. Add ice water gradually until dough holds together. Form into a disk, wrap, and chill for 1 hour. Roll into a 12-inch circle, transfer to 9-inch pie dish, crimp edges, and chill again for 30 minutes.
- Create the filling: Preheat oven to 375°F (190°C). Whisk pumpkin and sugar, then add eggs, vanilla, pumpkin spice, and salt. Slowly whisk in evaporated milk. Strain mixture for silky texture.
- Bake: Pour filling into chilled crust. Use foil or pie shield to protect edges. Bake 50–55 minutes until almost set with a slight jiggle. Cool at room temp for 2 hours.
- Decorate: Whip cream with powdered sugar and vanilla to stiff peaks. Pipe rosettes or dollops. Dust with cinnamon. Add pastry cutouts if desired.
Notes
For a gluten-free option, use GF flour in the crust. For dairy-free, sub in coconut milk/cream. Chill completely before slicing for clean cuts. Decorations should be added just before serving for the best visual appeal.
Nutrition
- Serving Size: 1 slice (1/8 pie)
- Calories: 320
- Sugar: 22g
- Sodium: 230mg
- Fat: 18g
- Saturated Fat: 10g
- Unsaturated Fat: 7g
- Trans Fat: 0g
- Carbohydrates: 36g
- Fiber: 2g
- Protein: 5g
- Cholesterol: 55mg
Follow & Join the Harmony Meal Community
📌 Love indulging in rich and cheesy comfort food?
Get inspired with more crave-worthy breakfasts, comforting dinners, and irresistible desserts.
👉 Follow us on Pinterest for easy-to-save recipes and meal ideas you’ll actually want to make.
📘 Let’s be foodie friends!
Join our community of passionate home cooks and flavor chasers.
👉 Follow Harmony Meal on Facebook to share your own dishes, get exclusive content, and connect with others who love to eat and create.