I often whip up the filling on a Sunday afternoon and store it in a sealed container in the fridge. Then, all week, I can layer up a quick no bake cheesecake cup in a minute for an instant after-dinner delight. It’s my little secret for having a homemade dessert ready without any fuss. There’s something so comforting about that creamy, tangy filling paired with a buttery, crunchy base, all in a perfectly personal portion.
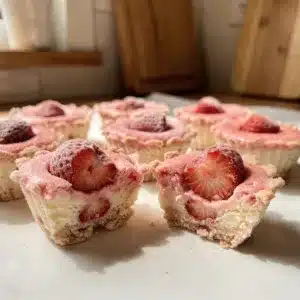
These No Bake Cheesecake Cups are the ultimate answer to the craving for something sweet and special, minus the stress of a full-sized cheesecake. They’re the kind of dessert that feels like a treat but fits into real life. Whether you’re looking for easy Indian dessert recipes to round out a festive meal or simply the best dessert recipes for a busy Tuesday, this one delivers. It’s pure joy in a cup, and I can’t wait for you to try it.
Table of Contents
No Bake Cheesecake Cups

These individual no-bake cheesecake cups are the ultimate easy dessert. A buttery graham cracker crust is topped with a creamy, tangy cheesecake filling that sets in the fridge. Perfect for make-ahead treats and endless customization with your favorite toppings.
- Prep Time: 15min
- Cook Time: 0min
- Total Time: 2h 15min
- Yield: 6 servings 1x
- Category: Dessert
- Method: No-Bake
- Cuisine: American
Ingredients
- 1 1/2 cups graham cracker crumbs (about 10 full sheets)
- 5 tablespoons unsalted butter, melted
- 2 tablespoons granulated sugar
- 1 tiny pinch salt
- 8 ounces (one block) full-fat cream cheese, softened
- 1/3 cup granulated sugar
- 1 teaspoon pure vanilla extract
- 1 cup cold heavy whipping cream
Instructions
- Prepare the crust: In a medium bowl, mix graham cracker crumbs, melted butter, 2 tablespoons sugar, and salt until mixture resembles wet sand.
- Divide crust mixture evenly among 6 serving cups (about 2-3 tablespoons each). Press down firmly with a spoon. Refrigerate.
- Make the filling: In a large bowl, beat softened cream cheese with an electric mixer until smooth and creamy, about 1-2 minutes.
- Add 1/3 cup sugar and vanilla extract to the cream cheese. Beat again until fully combined and smooth.
- In a separate clean bowl, beat the cold heavy whipping cream on medium-high speed until stiff peaks form.
- Gently fold the whipped cream into the cream cheese mixture using a rubber spatula until no white streaks remain.
- Spoon or pipe the filling over the chilled crust layers in the cups.
- Cover cups loosely and refrigerate for at least 2 hours, or until firmly set, before serving.
Notes
Ensure cream cheese is fully softened to room temperature to avoid lumps. For best results, chill for 4 hours or overnight. Top with fresh berries, chocolate sauce, or caramel before serving.
Nutrition
- Serving Size: 6
- Calories: 420
- Sugar: 22
- Sodium: 250
- Fat: 32
- Saturated Fat: 19
- Unsaturated Fat: 10
- Trans Fat: 1
- Carbohydrates: 30
- Fiber: 1
- Protein: 4
- Cholesterol: 95
Ingredients List
No Bake Cheesecake Cups come together with a handful of simple ingredients, most of which you likely have on hand. The magic is in how you combine them.

For the Crust:
- 1 ½ cups graham cracker crumbs (about 10 full sheets)
- 5 tablespoons unsalted butter, melted
- 2 tablespoons granulated sugar
- A tiny pinch of salt
For the Filling:
- 8 ounces (one block) full-fat cream cheese, softened to room temperature
- ⅓ cup granulated sugar
- 1 teaspoon pure vanilla extract
- 1 cup cold heavy whipping cream
Smart Swaps & Dietary Notes:
- Gluten-Free: Use gluten-free graham-style crackers.
- Dairy-Free: Opt for a plant-based cream cheese and coconut cream (chilled overnight, use the solid part) instead of heavy whipping cream.
- Crust Variations: Swap graham crackers for digestive biscuits, vanilla wafers, or even crushed pretzels for a sweet-and-salty twist.
- Lighter Option: You can use reduced-fat cream cheese, but the texture will be slightly less firm and rich.
Timing
One of the best parts about these No Bake Cheesecake Cups is how little active time they require. You get to enjoy the fun part—assembling and eating—without being tied to the kitchen.
- Prep Time: 15 minutes
- Chill Time: 2 hours (minimum)
- Total Time: 2 hours 15 minutes
That’s it! No preheating ovens, no water baths. Just 15 minutes of hands-on work for a dessert that chills while you live your life. Compared to a traditional baked cheesecake, which can take hours from start to finish, these individual cups are about 80% faster and infinitely less intimidating.
Step-by-Step Instructions
Follow these simple steps for perfectly set, creamy No Bake Cheesecake Cups every single time.
1. Prepare the Crust
In a medium bowl, combine the graham cracker crumbs, melted butter, sugar, and salt. Mix until the crumbs are evenly moistened and resemble wet sand. Divide this mixture evenly among 4-6 serving cups or glasses (about 2-3 tablespoons per cup). Press down firmly with the back of a spoon to create a compact, even layer. Place the cups in the refrigerator to set while you make the filling.
2. Make the Cheesecake Filling
In a large bowl, use an electric hand mixer or a stand mixer fitted with the paddle attachment to beat the softened cream cheese until it’s completely smooth and creamy, about 1-2 minutes. Scrape down the sides of the bowl. Add the sugar and vanilla extract, and beat again until fully combined and smooth.
3. Whip the Cream
In a separate, clean bowl, beat the cold heavy whipping cream on medium-high speed until stiff peaks form. This means when you lift the beaters, the cream stands up in firm, distinct peaks that don’t droop. Be careful not to overbeat into butter.
4. Combine and Fill
Gently fold the whipped cream into the cream cheese mixture using a rubber spatula. Use a broad, sweeping motion to incorporate them without deflating all the air you just whipped into the cream. Fold until no white streaks remain and the filling is uniformly light and fluffy. Spoon or pipe this luscious filling over the chilled crust layers in your cups.
5. Chill and Set
Cover the cups loosely with plastic wrap and refrigerate for at least 2 hours, or until firmly set. For the best texture and flavor, I recommend letting them chill for 4 hours or even overnight.
Nutritional Information
Per serving (based on 6 servings):
- Calories: ~420
- Fat: 32g
- Carbohydrates: 30g
- Sugar: 22g
- Protein: 4g
While these No Bake Cheesecake Cups are a treat, the cream cheese provides a good source of calcium, and using real ingredients means you’re enjoying a dessert without any artificial additives. For a lighter version, refer to the healthier alternatives section below.
Equipment Needed
You don’t need any fancy gadgets for these No Bake Cheesecake Cups. A few basics from your kitchen will do the trick:
- Mixing bowls (2)
- Electric hand mixer or stand mixer (A whisk and strong arm can work in a pinch for the cream!)
- Measuring cups and spoons
- Rubber spatula
- Serving cups or glasses (ramekins, mason jars, or even pretty tumblers work great)
Why You’ll Love This Recipe
These No Bake Cheesecake Cups earn a permanent spot in my dessert rotation for so many reasons.
- Zero Baking Required: Perfect for hot summer days or when you just don’t want to turn on the oven.
- Endlessly Customizable: The blank canvas of the creamy filling welcomes all sorts of toppings and mix-ins, from fruit compotes to chocolate shavings.
- Perfect for Portion Control: Individual servings mean no fighting over the last slice and easy planning for gatherings.
- Make-Ahead Dream: They actually taste better after a long chill, making them the ultimate stress-free dessert for parties.
- Crowd-Pleasing Flavor: That classic, tangy-sweet cheesecake flavor is universally loved, making it a safe bet for any group.
Healthier Alternatives for the Recipe
You can easily adapt these No Bake Cheesecake Cups to fit different dietary needs without sacrificing that delightful creamy texture.

- Sugar-Free: Use a granulated monk fruit or erythritol blend in both the crust and filling. The texture remains excellent.
- Higher Protein: Blend ½ cup of plain Greek yogurt into the cream cheese mixture and consider adding a scoop of vanilla protein powder (adjust liquid if needed).
- Vegan: Use a high-quality vegan cream cheese and whip the solid cream from a can of full-fat coconut milk that has been chilled overnight.
- Lower Carb: For the crust, use a mixture of finely chopped nuts (like almonds or pecans), a tablespoon of sweetener, and just enough melted butter or coconut oil to bind.
Serving Suggestions
The fun truly begins when you top your No Bake Cheesecake Cups. Here are some of my favorite ways to serve them:
- Classic Berry: A generous spoonful of fresh strawberry slices, raspberries, or a quick blueberry compote.
- Seasonal Twist: In the fall, try a dollop of spiced apple pie filling or a sprinkle of crushed gingersnaps for a pumpkin dessert recipes vibe. For a taste of the tropics, top with fresh mango puree—it’s one of my favorite mango dessert recipes inspirations.
- Chocolate Lover’s: Drizzle with warm chocolate ganache, sprinkle with mini chocolate chips, or crumble a brownie on top.
- Caramel Delight: A swirl of salted caramel sauce and a pinch of flaky sea salt is pure heaven.
- For a Party: Set up a topping bar with small bowls of different sauces, fruits, nuts, and sprinkles so everyone can build their own perfect recipes dessert.
If you love the combination of creamy cheesecake and fruit, you must try my Mixed Berry Cheesecake Crumb Bars for another fabulous, shareable treat.
Common Mistakes to Avoid
A few simple tips will guarantee your No Bake Cheesecake Cups turn out perfectly.
- Using Cold Cream Cheese: This is the #1 reason for lumpy filling. Let your cream cheese sit out on the counter for at least an hour until it’s soft and spreadable.
- Not Beating the Cream to Stiff Peaks: If your whipped cream is too soft, the filling won’t set properly. It should hold a firm peak.
- Overmixing the Filling: Once you add the whipped cream, fold gently. Vigorous mixing will deflate the air and result in a dense, less fluffy cup.
- Skipping the Chill Time: Patience is key. The cups need those full 2+ hours in the fridge to firm up and develop the best flavor and texture.
- A Soggy Crust: Make sure your melted butter is fully incorporated into the crumbs and press the layer down firmly. This creates a barrier that helps prevent sogginess.
Storing Tips for the Recipe
These No Bake Cheesecake Cups are fantastic for making ahead.

- Refrigerator: Store covered tightly with plastic wrap or in an airtight container for up to 4-5 days.
- Freezer: For longer storage, you can freeze assembled cups for up to 2 months. Place them on a tray until solid, then wrap individually in plastic wrap and place in a freezer bag. Thaw overnight in the refrigerator before serving. The texture may be slightly less fluffy but still delicious.
- Make-Ahead: The filling can be made and stored separately in an airtight container in the fridge for 3 days. Simply assemble your cups when ready to serve. The crust mixture can also be pre-mixed and kept at room temperature for a day.
For another fantastic no-bake dessert that’s rich and indulgent, my Baileys Chocolate Mousse is always a hit.
Conclusion
At the end of the day, these No Bake Cheesecake Cups are about more than just a sweet ending. They’re about creating a little moment of joy with minimal effort. They prove that the best dessert recipes don’t have to be complicated. They’re adaptable, reliable, and always met with smiles.
I hope this recipe becomes your new go-to for easy, impressive desserts. Give it a try this week—maybe with a simple berry topping or a decadent chocolate drizzle. I’d love to hear how it goes! Share your creations with me in the comments below, and don’t forget to tag @HarmonyMeal on Pinterest so I can see your beautiful cups.
And if you’re looking for more creamy, cheesecake-inspired treats, explore my Strawberry Cheesecake Overnight Oats for breakfast or the festive Gingerbread Cheesecake Dip Recipe for the holidays. Happy no-baking.
FAQs about No Bake Cheesecake Cups
How do you thicken no-bake cheesecake filling?
You can thicken no-bake cheesecake filling by using full-fat cream cheese, whipping the heavy cream to stiff peaks, and adding a thickening agent like cornstarch (a small amount) or gelatin (prepared according to package instructions). Chilling the filling for an adequate amount of time is also crucial.
How long do no-bake cheesecake cups last?
No-bake cheesecake cups typically last for 3-4 days in the refrigerator when stored in an airtight container.
Can you freeze no-bake cheesecake cups?
Yes, you can freeze no-bake cheesecake cups. Wrap them individually in plastic wrap and then place them in a freezer-safe container or bag. They can be stored in the freezer for up to 2-3 months. Thaw in the refrigerator before serving. Note that freezing may slightly alter the texture.
What kind of crust is best for no-bake cheesecake?
A graham cracker crust is the most popular and readily available choice. Other options include Oreo cookie crumbs, shortbread cookie crumbs, or even a simple digestive biscuit crust.
Why is my no-bake cheesecake gritty?
A gritty texture in no-bake cheesecake is often caused by undissolved sugar or improperly prepared gelatin. Ensure the sugar is fully dissolved during the mixing process. If using gelatin, make sure it’s properly bloomed and dissolved before adding it to the other ingredients.
Can I use light cream cheese for no-bake cheesecake?
While you *can* use light cream cheese, the texture may be softer and less stable than when using full-fat cream cheese. Full-fat cream cheese provides the best flavor and structure for no-bake cheesecake cups. If using light cream cheese, consider adding a bit more gelatin or cornstarch to help with thickening.
💬 Let’s Stay Connected!
For daily recipes, kitchen tips, and exclusive content, follow me on:
👉 Facebook for behind-the-scenes & community fun
👉 Pinterest for visual inspiration & meal ideas
👉 X (Twitter) for quick tips & trending recipes
📲 Join the flavor journey, your next favorite recipe is just a follow away!